Saturday, July 31, 2010

Saturday Morning Organizing

This morning I got up very early and after reading new postings on my favorite blogs from yesterday with my cup of coffee, I've decided to treat my family to a nice bunch of homemade cookies from scratch..... (Ha ha ha!)

If you ever were baking "from scratch" like me, you know it doesn't take a long time, but it was enough to reorganize my ribbon stash (which I am so embarrassed to show). Here it is.... I know.... :(


but not for long! Cut up cardboard box (do you recognize the box?) into spool type shapes, use two sizes large and small. You've the idea! Use small spools for longer ribbon and use large spools for ribbon that you have in shorter length. Secure the end of ribbon with pins.

Stack them neatly in a container (I am using a packaging box for Maracas from Michaels, that my daughter got for her Birthday)
and ... you are done! The good thing - I've organized my old ribbon stash the bad thing - now I can see that my stash is running low...
Well, cookies on the morning table may do the trick and my family may let me run to the local craft store to get more ribbon:) Looking for coupons already!

Have a nice weekend

Sincerely,


Friday, July 30, 2010

Fairy Cottage in the Woods

These are our favorite books of all times. Their written by Cicely Mary Barker and full of wonderful pop-up images. If you are familiar with art and books of Cicely, you may know what I mean, but if you are not - please, do yourself a favor and explore magical world of fairies created by this talented woman. We love to read these books in a dark room with a flash light: it makes it very mysterious and magical. All images coming alive and every time we are discovering something new.


Now we have our own Fairy Cottage hidden in the woods :) (I've used old birdhouse, hot glue gun and artificial flowers, or and my new image editing software)

and if you will look closely, you might see fairies living happily in this tiny cottage! Oh, here they are

Happy fairy searching!

Sincerely

Thursday, July 29, 2010

The Wizard of OZ Friendship Party

Lindsey from Filth Wizardry Blog, which I follow, made a wonderful post about their Emerald City project and since we also have been bitten by Wizard of OZ bug, I went back to my Blog to revisit my postings from April and discovered that I have never reported on The Wizard of OZ Friendship Party that we had at our house (?!). Where we celebrated friendship, creativity and recycling (we did it on Earth Day).Well, here it is!

Everything was green, and our Emerald City was a huge success!

Upon arrival each guest had to make a Friendship Bracelet out of “real” Emeralds

Special Glasses (here is a pattern)

And a special Friend TOTO (origami project – here is a pattern)

Then they were greeted by the Guardian of the Gates (my dear hubby) who let them start the party.

All kids were facing difficult tasks:

Pass the meadow of Poppies. The rule: the winner is the person who is able to lay still the longest time with eyes shut.

Walk through the dangerous pass (our hallway) filled with snakes and spiders stepping on marked tiles only to the Bad Witch Castle

Shoot the flying Monkeys (magnetic darts game, which I’ve embellished with Monkeys)

and here is my little monkey

Outside we were collecting water to melt The Bad Witch by bringing water in spoon from point A to point B and dropping it to a glass. The winner is the one who collected more waterJ


And we finished our party by making Yellow Brick Road Dangles (here is the idea)

and coloring a rainbow. Here is a free printable page

Each participant received:

Coloring book “The Wizard of OZ”

Rainbow Crayons. Here you can find how to make them

Patterns to make characters from Wizard of OZ using toilet paper cardboard tubes

Lion (Here is a pattern)

Tinman (Here is a pattern)

Scarecrow (Here is a pattern)

And they were keeping everything they made during the party. We had so much fun and on the way to Emerald City new friendships were bornJ

Sincerely,

Wednesday, July 28, 2010

My New Signature

You may have noticed my new signature that I am using on the bottom of my postings now. I love it, and the best part of it - it's FREE.
You can create it at My Live Signature . I am planning to use it on my pictures as well, I just have to learn how:)

Have fun!
Sincerely,

Tuesday, July 27, 2010

Where Bloggers Create II


Hi, everyone. Did you ever had a moment when you think of something and then it happens?It's a little freaky... Well, it happens to me very often lately. Here is an example: I am reorganizing my office and few of my next posts on my Blog should be showing what I've done so far, but the thought that I had in my head was to find out how other creative places are organized and how people come to their creations. Guess what, I came across a fabulous blog by Karen Valentine from Scottsdale, AZ called My Dessert Cottage and there she had a fabulous Bloggers Party that she hosted for the second time called Where Bloggers Create II. Hundreds and hundreds of Bloggers opened their doors to show their studios! Can you believe it!!! But be careful what you are wishing for, because last night I went to bed around 2 AM after visiting so many fabulous places, and I am on letter C only (all participants are alphabetized). If you have time, stop by and take a look some studious will make simply green with envy:)
Here are few of my favorites so far:


I am having such an amazing journey so far, filled with inspiration and lots of new ideas.

I hope you'll take a look and may be will discover a pal that you may want to follow! Who knows but it's definitely worth your time.

Sincerely,

Monday, July 26, 2010

A Book End Made Out of Milk Carton and An Old Book

Me and houses..... While back in April I've had an Emerald City Project, where I went a little bit crazy
It's been built out of 32 boxes in different sizes and you can read more about it in my April posting "Emerald City Part 2"

The project today is much more modest:) We are going to be making a book end out of milk carton and an old book cover that I am using as a roof.

Materials you will need: milk carton, zip lock bag filled with sand to serve as weight, an old book cover (I am using my daughter's old book with shapes) and old wallpaper to cover it all.

Before:

After:


I think it is kind of self-explanatory, but if you have any questions - please, let me know. I am here to help:) By the way, this Book End is part of my upcoming collection on how to organize and recycle....

Piggy Bank Out of Large Soda Bottle

Here is another great project from Disney Family Fun that couldn't resist: Piggy Bank out of large soda bottle.

I think with school starting soon or in some cases already going, Piggy Bank can serve as a great motivational tool:)

You will need a soda bottle, tissue paper ( in my case I've use 1 1/2 sheet), two toilet paper tubes cut in a half for the legs, chenile stem for the tail, button for the nose and two wiggle eyes. Web site suggests to use toilet paper tube for ears as well, but I decided to go with craft felt, Mod Podge to apply a tissue paper and Tacky glue to attach the rest. Very simple! Me like it:)

I will skip a picture of soda bottle:) Here it is after two coats of freshly applied tissue paper:

After it is dried (usually overnight), time to start the assembly line going: glue button as a nose, add wiggly eyes, form and glue down the ears (if you need a pattern that I've created, let me know and I'll send you one). Glue the legs down and a tail. Let it dry, cut out the coin slot using craft knife and you are done! or.... if you are as crazy as me you can take it a step further and have fun with paint:) That's how it looks like when it's all finished

Happy savings!

Note: for more detail, please go to Disney Family fun recycling craft:)

Thursday, July 22, 2010

Milk Carton Wallet

I am so thrilled to discover may be well known to many but new and exciting for me web site
Disney Family Fun. Their "Craft" section filled with great recyclable projects and they, as you may noticed by now, are my passion lately. I am amazed at how much you can do with things that I have never thought could be reused in such a creative way. Here is one example: Milk Carton Wallet and here is my attempt to do the same:)

Step 1
Get ready. Get a carton you would like to use

Step 2. Cut it open and lay flat


Step 3. Trace the template on the outside using Sharpie and trace all the doted elements on the inside using ballpoint pen to get good imprints on the box


Step 4. Cut out along the traced lines and fold it according to all doted lines


Step 5. Here is your wallet


It works!!!!

Here is a link where you can even watch a video on how to make this:


Think about how much fun would it be for kids: it is perfect to store little treasures,


and how many boxes will be recycled! I think it can make such a cute gift and it could be embellished in so many ways (decoupage is the first thing that comes to my mind)!
Thanks Disney Family Fun!

Wednesday, July 21, 2010

Worm Wishes... - New Addition to Softies

I usually make a new toy, when I have enough plastic grocery bags (I use them for stuffing), but since we switched to reusable shopping bags it takes a while now:) I may have to ask my neighbors to help me out and share their recyclables:)

Here is our latest addition to our handmade softies:

It is a girl worm, born last night and very new to this world

and that's what she is wishing for:
to have a name (we are taking votes right now)
to be longer (we are collecting more plastic bags as we speak)
to have a hat (any suggestions are welcome)
to have a friend (ideas on gender, name, occupation)
FYI - the project took 22 plastic bags and 2 sleeves from an old P.J. :)


Tuesday, July 20, 2010

Cold waters of Monterey

Every vacation is always shorter that you think, isn’t that the truth? But our short trip to California gave me so much energy, memories and pictures that I hope will keep me fully charged for quite some time.

Our first stop was at Marina Del Rey.

We were at this place before but this time we’ve discovered a great service at Marina – it’s called Water Bus, it runs Friday PM through Sunday only, and it cost only $1.00 per person (Can you believe it!!!!!) to any one way destination within Marina. That helped us a lot to explore the territory.

Next stop was Santa Barbara (of course!)

It was a windy day but we still had a chance to enjoy the city, walk along the beach,

enjoy a supper delicious Clam Chowder Soup at Moby Dick and take a ride on my favorite Carousel.

I LOVE Santa Barbara!

On the way to Monterey!

We decided to go to Monterey along the shore line to enjoy the ocean views, but the road was so curvy with million turns and twists and road construction that it took away all the excitement and left us plain tired at the end of the road, the only good thing that we have discovered along the way was Ragged Peak .

I’ve heard about Ragged Peak on Today show and we couldn’t miss an opportunity to stop by and explore it ourselves. That was the best decision!

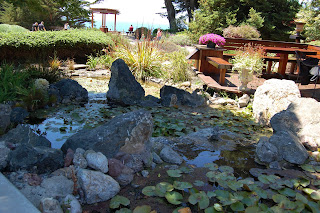
It is such a beautiful and unexpected oasis with great food, spectacular views and Zen harmony

only two hours away from Monterey.

Monterey, CA

I’ve never been to Monterey before. Santa Barbara was the farthest destination in California that I had a chance to visit and let me tell you, Monterey is so different:

sand dunes,

cold winds,

rough ocean

and unbelievable sunsets

took my breath away. The beach is not as crowded and it gives you a chance to connect with Mother Nature on a new level. I will never forget my long walks along the beach,

cold water under my feet

and coarse sand of Monterey dunes.

Even the ocean wasn’t nice and warm we still had lots to do!

Monterey Marina with Seals bathing on a sun

Monterey Aquarium

Ride on a lake

and fun on a play ground ,

these are just a few activities to name

We also went to Carmel,

and took the famous 17 Mile Drive with one Stop at Pebble Beach Golf Course.

I’ve got an amazing feeling of surreal experience – places that you’ve seen on TV are right in front of you.

You are part of it, you are here!


Ventura, CA

After 3 days we had to say “Good Bye” to Monterey. I couldn’t believe how fast time gone by! Ventura was our next and final stop…

Every hotel we stayed in was located on the beach, Venture wasn’t an exception. After a long ride from Monterey we were very tired

but still decided to pay a visit to the longest pier at Ventura and watch the fishermen and explore their culture.

Everything at that pier designed to accommodate their needs – there are places to clean and cut the fish and even to recycle fishing wires.

Next day in Ventura was more fun, may be because we rested well at nightJ We decided to go to Marina and ended up being a part of Pirates Days in Ventura.

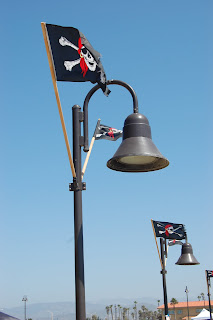
That is so much fun! “Real” Pirates are everywhere! You can see their ships in marina,

you can hear their songs. Too bad we had only few hours to spend their but we managed to get a “real” Pirate’s ice cream,

to eat at the restaurant where Pirates eat,

and have fun with Photo PropsJ

Now we were ready to go home. Thanks to beautiful places in California for this unforgettable trip, but now we couldn’t wait to see our front door and say “Home sweet home!”

Our car became our home on wheels during this vacation

and some things that I’ve made have served us really well: our trusted carry all,

Imaginarium

and my Beach Bag

are the winners!

Now, I have to work on all those projects that are on my to do list!