Sunday, December 5, 2010

Soda Can Ornaments


What CAN be easier? These ornaments are fun and fast to make, and they cost you almost nothing.

You will need one soda can, in this case it doesn't matter if it is regular or diet (ha ha ha)

Start by dissecting your soda can like so


I don't have craft scissors but my heavy duty kitchen scissors work just fine

Split your can body like that

Then across, like you see on this picture


Now create your petals


Pinch each petal in the middle of the wider end


Using top and bottom of your can as two bases attach your petals using Gorilla Glue

Two ornaments out of one soda can - how cool is that?!

Let the glue dry and then spray paint front and back of your ornaments

It looks pretty already doesn't it? You can stop here if you like this result or you can continue with me.
When your paint is dry apply Gorilla Glue to the center of the flower
and sprinkle some gold beads


Let it dry again. Then outline the edges of the petals with glitter glue and sprinkle with gold glitter
I am using

Shake off excess glitter

and there you have it - your beautiful Christmas Tree ornament


Have a great day and stress free season.

Sincerely,
I am linking this project to my favorite link parties


Wednesday, December 1, 2010

Snowmen Project for a 3-year old

Since we are talking snow, why not to have a project directly related to this subject. For the past few days my daughter's favorite book is "Snowmen at Night" by Caralyn Buehner. She only talks about snowmen and trying not to fall asleep at night to see what they are up to - so cute!
So you can imagine when I told her that we are going to do a project with snowmen she was ready to go in a second.
Before the project, I've cut out some shapes out of craft foam like trees, snowmen noses, and hats for snowmen in different shapes for her to choose from.


I've used my circle paper puncher to get some perfect circles "to build" our snowmen


then we added some miniature pom poms


and the most exciting part - for the first time my 3-year-old used glitter!!!!!!


and that's what we've got. Take a look!


Playing snowmen (we added some painted cardboard "trees" as well)

Tired snowman.

It was a very fun project! I hope you'll try it!

Have a great day.


Let It Snow - 3D Snowflakes


December is here and it always brings my childhood memories and some of them are about making paper snowflakes. It was a fascinating moment for me as a child to watch how a folded piece of paper and a pair of scissors could produce something as delicate as a snowflake. Well, I have experienced the same fascination again when I came across this TUTORIAL - it brought my childhood memories on a new level - Snowflake in 3D what can be better?!
Here is my take on it:


Let it snow!
Have a great day!


Thursday, November 25, 2010

Happy Thanksgiving

I am wishing all of you a very Happy Thanksgiving filled with joy, laugh and many thanks


Personalize funny videos and birthday eCards at JibJab!

Wednesday, November 24, 2010

Cup full of Thanks


Every year we celebrate Thanksgiving in a large gathering of 35-45 people at my friend's house. Everything is done in a potluck style: great food and great recipes always. We do it for ten years now and I think I call it a tradition by now, another tradition that we practice for this gathering is saying a grace before and after the meal, but this year I've decided to add something new to this tradition: we are going to have a Cup Full of Thanks .....


I found beautiful FREE Thanksgiving printables HERE . On each piece inside, I've printed in large font some simple things that we use or see but forgetting to acknowledge sometimes.


Each guest will pass the cup filled with messages to each other, pull one and read it loudly starting with the phrase "I am thankful for..." and then read what's inside. Things I've included are for example humor, beautiful flowers, GPS, WiFI, Facebook, Sunsets, cell phones, movies in 3D and etc. You've got the point. I think it could be a fun, will see!

There is always a place for a new tradition, right?

What are you doing to make your Thanksgiving even more fun?
I'd love to hear it!

I hope you'll have a great day


Monday, November 22, 2010

Turkey Brine


If you are in charge of turkey this year and wondering what to do to please your company, here is a recipe of a brine that makes every turkey super delicious and you are guaranteed to get a lot of compliments:)

Brine Ingredients

1 gallon of water
1 small orange sliced in half
1/2 lemon
1 cup of Kosher (coarse) salt
3/4 cup of granulated sugar
1 large head of garlic sliced in half crosswise
1 table spoon of black peppercorns
6 branches of fresh thyme
4 branches of fresh sage
1 bay leaf

In a large pot combine all ingredients and bring to a boil, stirring from time to time. Let it boil for 3 minutes, set it aside and let it cool. You can store it in a fridge for up to a week.

Usually you brine your turkey for 24-48 hours and here is how: Place your bird into a clean plastic bag and lower into a bucket or deep bowl. Pour the brine through the strainer into the turkey bag. Move your turkey around a little bit to make sure the brine will fill the cavity. If your turkey is too big and brine doesn't cover it, add some cold water to make sure your bird is completely submerged. Seal the bag tight and put in a fridge for 24-48 hours to soak.

After that no matter how you cook your turkey, you can't ruin it - it will be moist and delicious ALWAYS. I've roasted, deep fried, baked in a brown paper bag, baked without brown paper bag mine and it came absolutely fantastic , I think it is pretty encouraging.


Have a stressless holiday:)

Sincerely,


Last Minute Autumn Wreath


Hello, there
Where did this month disappeared? Thanksgiving is going to be this Thursday but you still have sometime for a last minute decor on a dime!

You will need two pieces of cardboard, plastic table cloth, plastic letters from you child's ABC set and few Autumn related items for decoration (I am using few Autumn leaves from a Dollar Store)

Cut two cardboard circles


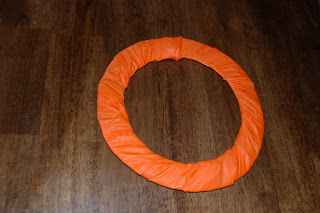
Wrap them in orange plastic table cloth


Add letters and decor using your choice of glue.


Enjoy!

This project is very easy and suitable for kids and I think all recyclable elements of this wreath can bring a very good conversation with your children about recycling and being thankful to Mother Earth.

Have a great day!

Linking this post to The Shabby Nest Blog