This is another project in my Halloween Series. Spiders are always part of our Halloween Decor, but this year we've decided to make them cuter:)
Materials needed: 1 large bead and few medium size and smaller size beads if you will decided to do any other versions besides version #1, and 4 chenille stems. If you don't have a bead with large enough hole, you can use pieces from ponytail holders as I did in our first spider.
Version #1

Feed 4 stems through the bead hole half way. Twist each half around to secure the legs and fold them in the shape of spider legs. The ends of chenille stems are rather sharp, that's why I prefer to do a little loop on the bottom of each leg to avoid any injuries or you can do what I did in .
Version #2
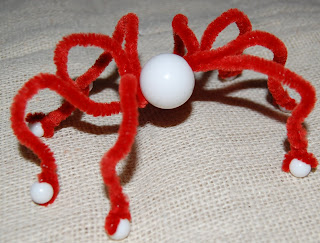
The only difference in this spider is that we added bead on the bottom of each leg.
Version #3

This spider had beads on the bottom of each leg and on top of each leg.
Version #4

Or if you have enough beads in the house, you can go all fancy and make your spider like we did.
We used three different bead sizes: the largest one - for the body, the medium size for the bottom of the feet and for all knees, and the small size to cover the space between those two sizes. Chenille stems are great for this project as well: they are small enough to go through the holes and when you twist them on the bottom of each leg it gives you a nice furry effect.
Here is our spider evolution in a brief:)

Have a great day!

No comments:
Post a Comment