Wednesday, May 5, 2010

Girlie Girl Necklace out of tights


My daughter, who is not even 3 yet into necklaces, purses and hats. I was looking through craft magazines at a bookstore (my usual thing) and found an interesting idea: necklace out of silk scarf. Well that project required sewing and etc. I don't have that much time:( So.... Let's make similar necklace from nylon tights! No sewing what so ever! Fast and effective - as I like it!

You'll need nylon tights in any color. I am using tight for 18-24 months kids in red.
8 beads 1/2" in diameter and 1 center one3/4" in diameter (I am using a bouncy ball as a center piece and 8 mismatch color beads from my daughter's old ponytail things

Let's begin.
Cut off the leg portion of the tights you are working with.

Tie a knot leaving some room at the end.

Insert a 1/2" bead. Tie the knot again.

That's the main idea - each bead will be separated by a knot .

In my case, I've used nine beads. When you are done with the last one, tie the last knot to secure the final bead and tie the leg piece filled with beads to another leg piece creating a bow. Do the same on the other side of your necklace. Trim extras to create a flower effect.
You are done!

I guess. I've got my daughter's approval - she seems to like it!

Tuesday, May 4, 2010

Soft Toy - Robot Robbie - Tutorial


My daughter loves Yo Gabba Gabba on Nick Jr. Her favorite character is Robot Plex but she calls him Robbie?! Well, I've decided to create something similar, especially when you have a piece of furniture foam laying in the garage:)
The piece I am talking about was 30" long 11" wide and 4" deep.
You will also need yellow felt or fleece fabric, black felt for face and some body trim, white felt for eyes, I've used my old Thermal Suit in Silver Color for arms, legs and chest pocket, but you can use any material of your choice. You will need some buttons to decorate the body and some thick black thread for decorative stitching.

Step 1. Cut out your foam piece into head, body, hands, feet and neck


Step 2. Time to practice your gift wrapping technique. That's what I was using wrapping each piece in yellow fabric and securing ends with yellow thread. It's fast and fun.

Step 3. Create the face of your robot

Step 4. Create arms and legs. In my case, I've used regular rope for arms and legs, because I needed something sturdy to attach feet and hands to, and I covered the rope with sliver material sewn into sleeves. Note: make sure you'll put your sleeves on arms and legs before you'll attach feet and hands.

Step 5. Assemble your robot and decorate the way you want it:) Congratulations - you are done!

The finished size of our robot is 39"and he is as tall as my daughter:) So far, he's been a great help in our daily routines and we highly recommend to have robots at home, especially if you are dealing with potty training, not eating veggies and some other serious stuff.....

Toy Organizer or Picnic Bag


I’ve had this table runner from Ikea for almost 5 years. I’ve got it when we had a little condo but we moved into the house my Interior vision had changed and this runner was hidden in the garage. If you will look through my previous posts I am into organizing lately and I have decided to make a toy organizer which also could be used as a picnic bag.

You’ll need I table runner. Mine was 18” wide and 45” long.

Red felt to trim the cuts.

1 heavy duty needle and thread.

4 large buttons

2 pieces of rope for the handles

Elastic band is optional (I’ve used it to organize my daughter’s Barbie Dolls)

Hot glue gun

I’ve planned to have a pocket on the outside of my bag and that was the only cut that I had to make. This project is very easy.

Step 1 Cut out your future pocket, considering the items you are going to be putting in plus extra ½” for bottom stitching.

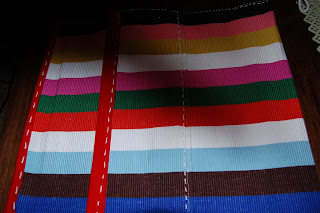
Step 2 Create the bottom of your bag. Find a middle part of your runner/fabric and fold each side as you see on this picture

In my case each fold is 3", which creates 6" base. The wider your base the sturdier your bag is going to be. Trim the top of your bag with red felt.

Stitch the sides of the bottom .

Step 3

Front pocket
Secure the pocket in the location of your choice but leaving some room for the handles. Trim the top of the pocket with red felt. Stitch the bottom of the pocket to the bag. Don't stitch the sides yet.

Step 4 Elastic band for Barbie dolls.

We don't have a lot of Barbie dolls in the house, that's why I've created only 6 openings to hold them all, but you have more you can create extra rows:)

Step 5 Working on handles. I've used a regular rope. Create some loops on each end of the rope

In my case, I've had two pieces 30" each before the loops. My idea also called for some buttons in red, well I didn't have exactly what I've had in mind, so I had to create my red buttons.

I've used Red Spray Paint and here they are

Step 6 Attach handles to the bag and secure the back of the stitches with some red felt and hot glue

Step 7. Stitch the sides of your bag.

and you are done!

Time to organize your child's toys! I hope it helps and as usual - Have fun!

Cute Little Hanger


I don’t know how about your kids closets but my daughter’s little closet completely filled up with outfits on mismatch hangers. I bought few sets of pink hangers to keep it all in style but it didn’t last for a long time. Now, I’ve decided to start a closet makeover on $0.00 budget.

You’ll need a regular hanger from any store. I’ve used old bed sheet, that I’ve torn into 1 ½” strips. Any ribbon to decorate the hanger.

Step 1. Remove size tag.

Step 2. Put a dab of hot glue on one end of the hanger and start wrapping your fabric around.

Secure another end with the same hot glue. You are done!

Step 3. Decorate your hanger with a bow or cute button.

Use your imagination.