Friday, October 22, 2010

Look Whoo is Here


Meet the Owls - our new pine cone friends that we've made this morning, thanks to this fabulous tutorial


We followed the instructions precisely and it works!


Look who may show up at your front door for trick-or-treat! Note all names and colors were selected by my 3 year old, so here is the family


Daddy Owl


Mommy Owl


Baby Owl


Have fun!


Sincerely,


I am linking this post to

Thursday, October 21, 2010

Meet Zoe

Zoe is a virtual dress-up doll and during 13 nights before Halloween she will try to decide what costume to wear, and she will be trying new costume every day. You can follow this link and enjoy a wonderful creation of Jenny B. Harris, illustrator and designer, which I admire so much.

But when I saw Zoe, I started to laugh because we are having another "Zoe" in our house. My daughter is trying out new outfits for Halloween every day but she is having a hard time to decide what to wear. Here is a little journal of her "struggle".

Last year Princess too small:(

May be a Witch Costume from last year?


May be Marry Antoinette black wig? "Hello! Versailles?


May be a Sailor?


May be a Pirate but glamorous


May be just glamorous?


May be just silly?

I hope this virtual Zoe will redirect my little "Zoe's" energy into virtual dress-up. At least I am willing to try:)

Have a great day and I hope your costume decisions will be less painful:))

Halloween Ornaments Part 1

I love ornaments - and thanks to Martha I've discovered that I can have them on other holidays besides Christmas. When I saw this idea I knew I had to make it!
Here is my take on it.

Large tree brunch was easy - I have plenty in my backyard.

Then we painted the brunch in black. That was a lot of fun!


and we mounted the brunch in my favorite Halloween Pot with the sign that still makes me smile"Trick or Treat Smell My Feet. I've got it 5 years ago on clearance for $7.00 at The Great Indoors. I still remember the original price was $79.00. Can you believe it?!


The first part is done!

Now ornaments.
This is half of my mirrored tree topper, which wasn't made really well but served me great for my Disco theme Christmas tree decor.


First, I have disassemble it and removed silver beads from each stem


Then I've painted spiders on one side and spider web on another using black acrylic paint. When paint was dry I glittered the spider and sides of the ornament with Black Anthracite Glitter from Martha. Here it is


Now it was time to put it all together. I've got my hot glue gun ready. I put a black bead on, then I added a black bow and top it of with thick black thread for hanging


I am so happy to see how it is all coming together, but this is not it. I am working on another set of ornaments which I will post soon


Happy decorating from

P.S. I am linking this post to


and

Wednesday, October 20, 2010

Spooky Goblet for Halloween out of Soda Bottle

First of all, let me brag a little bit. One of my projects have been featured on two fabulous Blogs:


Photobucket"

I am so excited! Thank you, girls!
Now, back to business. Halloween is getting closer and closer and I am getting busier and busier in wrapping up my Halloween To-Do List.
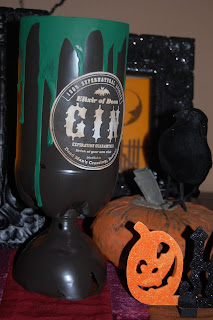
Here is another easy project: Spooky Goblet
You will need one Large Soda Bottle and Acrylic Paint in Black and Green

First, cut your bottle as you see on the picture bellow.

Then connect two parts, by cutting the bottom of the bottle through and inserting the top in the hole. Secure both pieces together by twisting the cap on


Now paint your goblet

in Black and let it dry. Then squeeze the green paint around the top of the goblet and when everything dried

attach any of the Halloween Labels that you can find here.

Have fun!


I am linking this project to

Spooky Mirrors Halloween Tutorial


Another easy project, thanks to Martha. I came across few interesting ideas on Martha's web site, but who doesn't right?

First one called Vellum Halloween Table Lanterns you find it here

and the second one called Mirror Glow Eyes, you can find it here

I decided to combine both projects and here is the result


I've used templates for lanterns as Mirror Shapes, which I cut out of old cardboard box which painted black.


The center of the lantern became my mirror shape, which I cut out of old helium balloon (I know, it probably makes me sound very cheap: )) but I am sure kitchen foil will work just as fine. Then I've painted Spooky Eyes over foil part using the same black paint. I hang them over my existing frames using suction cups with hooks and tah dah!
Oh, I almost forgot - the embellishments on the mirrors (the orange circles on top) you can find here

New Halloween Decor and No Money Spend - AGAIN! Thanks Martha! Thanks Jenny!

Have fun decorating for Halloween!


P.S. I am linking this post to


and

Tuesday, October 19, 2010

New ATC

Here is another ATC that is going to fly to Portland tomorrow morning. It's called Iris and it is for the swap I am in on Swap-bot.com called "Whats in the garden".

I love Irises for the architectural features and abundance of colors! I usually look in the center of the flower and that is what I was trying to capture in my new ATC

Have a great day!

Spooky Pumpkins


It seems to me that one old black T-shirt can go a very long way. I've used it for my Halloween garland Project, Halloween Backdrop Decoration, to hang my Halloween Garland for Outdoors (coming up) and now I am using T-shirt sleeves to make some Spooky Halloween Pumpkins.
Here is what you need to create one pumpkin

T-shirt Sleeve


Cut the rounded part off to make more of a rectangular piece

Hand stitch one end together


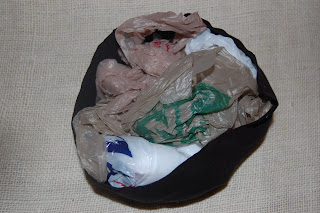
Stuff with plastic bags


Now hand stitch the top portion together

Now, you are ready to paint. I am using interior paint that I had as leftover from my previous Faux finishing project, but I am sure you can use any other paint.


We were very generous with our paint, but you can use as much or as little as you want to, because during this phase you are creating the "look"


Let your pumpkins dry for at least 24 hours - fabric soaked in paint dries slow....

Now you can cover the top and bottom on the pumpkins with olive green fabric - in my case, corduroy pieces, but you can use craft felt.

Note: I was trying to create some ribs on pumpkins using heavy black thread, but I didn't like that look - may be because the fabric was too stiff after being treated with paint and ribs just didn't look right....


To create the pumpkin stem - I've rolled up the fabric and glue the end using hot glue gun, then I cut one end of that roll at 45 degrees and attached that end to the pumpkin with hot glue again.


Here we go! All set and done.


Another decoration for Halloween and the best part - No Money Spend!

Have a great day!


I am linking this project to


UndertheTableandDreaming


and
 http://linda-coastalcharm.blogspot.com/