Showing posts with label craft tutorial. Show all posts

Thursday, October 28, 2010

Halloween Ornaments Part 2 Tutorial

Now, it is time for my Halloween Ornaments Part 2, in my previous post I have disassembled my old Christmas Tree Topper to create a set of Halloween Ornaments inspired by Martha's idea but this time I am creating something from scratch...
I've participated in Vintage Ephemera E-Swap at Swap-bot.com, and one of my trophies was a wonderful set of Vintage Halloween Images, which I've put to a good use.


Step 1
Collect single serving boxes from Sun-Maid Raisins


Step 2
Paint sides of the box in orange


Step 3
Glitter sides with Orange glitter


Step 4
Glue images to the front and the back of the box


Step 5

Embellish!!!! I've used different scraps from my previous projects, but I wanted all my ornaments to relate to the Black Crow that is sitting under the tree (I found it at the Dollar Store) and that's why I've used black feathers as part of my decor.


That's how it looks all together.


Now I can put a check mark next to this project as well:) Let me tell you, this is the busiest Halloween ever for me but it is so much fun!
Now, I have to come up with a costume idea for moi.... (Did I forget about myself?!)

Sincerely

I am linking this post to


The Girl Creative
Entertain Exchange


Tuesday, October 26, 2010

Halloween Wreath

It's all started with one of my discontinued cabinetry catalog. The pages were nice and thick and I've decided to use them for something crafty vs. giving up for recycling.
Well, step 1

Paint each page in two colors: one side black and one side orange.


Step 2
Roll paper cones and secure each roll with hot glue. Trim edges to make them look nice and even.


Step 3
Arrange all your cones in a nice circle and glue them to a base of your choice.

You can see mine - it is a cardboard where I've cut a center

Step 4 (optional)
Embellish each cone. In my case I am using a decorative border from this napkin.
Cut the border and glue it to each cone

Step 5
Paper plate flowers tutorial you can find here. Add your flowers to the wreath. In my case I've used black plate and painted it orange on the back.


Step 6 (Optional)
I added a Witch on a Broom (my Dollar Store Find) and a cute Free Printable "Boo" Sign


Step 7
I've used a fishing wire to hang my wreath. The final width is 36" and it makes a very nice statement. Now that my front door is done, I can finally see the finishing line for this Halloween Fun Marathon:)

Have a great day!

Sincerely,


I am linking this project to Show and Tell party at Blue Cricket Design


Do you like Cardboard? Halloween Garland Tutorial

I love cardboard! It is free (how many packages we receive and we send to recycle?!) and it has a fabulous texture. I've used it on my last ATC "Iris" and now I am ready to use it again for my Halloween Decor.
Let's go!
We need cardboard, black and orange acrylic paints, free printable letters you can find here, and how-to on strings here

Here it is - a beautiful piece of cardboard


Your goal is to "open" it and expose the hidden texture


Now you are ready to paint. First in Black


and after it's dry, add some orange paint working across the rims using dry-brush technique


Now, the fun part. Cut you cardboard in pieces large enough to display your printed letters and punch two holes for the string. Note: Each letter comes in 8"x10" size but you can resize it to the size that is working for you.


Feed the string through and you are done!


It may be considered as a last minute Halloween project:)


Have a great day!

Sincerely,


I am linking this project to

All Thingz Related


Monday, October 25, 2010

Bucket For Trick-or-Treat Tutorial


Last year my daughter was a Witch and she had a very cute small Black Cat Bag for Trick-or-Treat, but now since she is three - she understands "the candy" thing very well and we needed to create a new candy carrier for this year. Why not?!
OK. You will need any large plastic container like this one from Costco.


Craft felt for Owl's Face and old t-shirts for feathers or you can do felt all the way.

Cut out your "feathers" out of T-shirts. You'll see the shape of feathers on the picture but you can go longer or shorter if you like. Note: if you are cutting sleeves - save the top of the sleeves -

they make perfect wings, but we will get there, and also drill two hole on each side of the bucket for the "handle"


Now, start from the bottom of the bucket and work your way


Decide where Owl's face will be and leave that area free of "feathers"


Now, for the face I've used hard craft felt. I don't know if there is a better name for this product, but when you touch it is very stiff. Here it is. I am sorry, I don't know how to add PDF files to my post for easy download, so I am thinking may be you can enlarge this image and use it as a template?!


Now the wings. Fold each top of the sleeve in a half and trim edges. Now, glue each wing down along the straight edge .


That's how it looks from the side


and from the back


There you have it - a very cute creature ready to help you to Trick-or-Treat:)


Have a good one!


I am linking this post to


mmm button


Wednesday, October 20, 2010

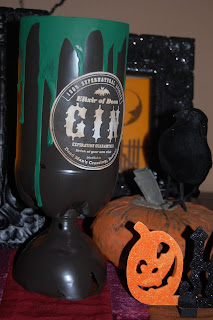
Spooky Goblet for Halloween out of Soda Bottle

First of all, let me brag a little bit. One of my projects have been featured on two fabulous Blogs:


Photobucket"

I am so excited! Thank you, girls!
Now, back to business. Halloween is getting closer and closer and I am getting busier and busier in wrapping up my Halloween To-Do List.
Here is another easy project: Spooky Goblet
You will need one Large Soda Bottle and Acrylic Paint in Black and Green

First, cut your bottle as you see on the picture bellow.

Then connect two parts, by cutting the bottom of the bottle through and inserting the top in the hole. Secure both pieces together by twisting the cap on


Now paint your goblet

in Black and let it dry. Then squeeze the green paint around the top of the goblet and when everything dried

attach any of the Halloween Labels that you can find here.

Have fun!


I am linking this project to