Tuesday, July 6, 2010

How to build Imaginarium

I call it - Imaginarium, because that's what it is:)
Your child will use her imagination to create a different story every time when using this simple tool.

Materials needed: The bottom of vegetable tray/or any other large tray with multiple dividers,
old magazines, catalogs or calenders with images that will awake imagination,
glue, nail polish to paint dots or any other paint that will work with plastic.

Cut out images and glue them to the bottom of the tray in any order.
Decorate the dividers using nail polish (I did it outside without my child, because of the fumes) or paint. Use your imagination:) That's it!

I've made it yesterday and this morning we already used it to play "Thumbelina Story", we practiced counting different color dots, we played Labyrinth trying to roll a little bead between dividers and now my 3 year old playing with unicorns by herself using Imaginarium for almost 45 minutes, giving me a chance to work on this post. Not too bad for something that cost us NOTHING (oh well, a little imagination, perhaps, but that's it!)

Monday, July 5, 2010

Bottle Up!

On my latest trip to the library I've discovered this wonderful book.
I've had exactly what I needed to complete the project featured on the cover:) Lucky, ah?
Materials needed: glass bottles, masking tape, paint suitable for glass (I've used Krylon)
Clean the bottles and remove all tags.
Create the pattern using masking tape.
Paint the bottle and let it dry.
Remove the tape and reveal your new treasure:)
Very easy! Have a great day.

Thursday, July 1, 2010

Birthday Celebration - Ocean Inspired


My daughter turned 3. I like this age a lot! Pretend play, magical transformations, craft projects - sky is the limit, that's why I took this Birthday so serious:) Here is a brief report.
The day before:


We put up the sign and set up a Birthday Presents Station....

Fish cut outs were leading from the bedroom to the presents
Turtle was carrying a case with Magic Shoes
and there was a Mermaid dress (made by Mommy:)) and a crown and everything else what every sea princess needs
In the morning. The gifts were opened in no time and then we were waiting for the guests.....
and they came!
Late afternoon was spent with close friends - splashing in fountains and that was a lot of fun!

and then we had a cake!!!!

What a day and so many memories to share

Drill, Baby! Drill!


When I thought that I'got all toys of my little girl under control her 3rd Birthday happened and it's all over again!
Storage, storage and more storage! I am on a hunt for anything that can serve that purpose. Here is one example of my hunting trophy: favorite Apple Sauce jar......

Wash it, remove the tag, drill the top of the lid and you are done!
How many things can it store?! It's up to you:)


Monday, June 28, 2010

Name Tag or Place Card?


In my previous post "Napkin Ring Ocean Inspired" you could see a tag attached to the ring with the name of the person. Let that person be Captain Jack, since everything is ocean inspired and yes, I do love Pirates of the Caribbean.

Let's make it!
Materials needed: brown paper bag, paper puncher in desired shape, single hole puncher and a jute rope. Starfish stamp is optional.

Fearlessly punch out as many tags as you can out of your brown shopping bag, making sure you are selecting non wrinkled spots.

Punch single hole in every tag, decorate with stamp of your choice or leave it as it is, let the ink dry. Tie the rope and you are done!
Easy breezy! You can use as place card if you'll tie it to a napkin ring, or as a name tag if it will be placed around button or you can use it however you want and write whatever you want, the most important part is to have fun, right?

Napkin Ring Ocean Inspired

Happy Monday, everybody. I've had such a busy and fun run during last few days that it took me the entire Sunday to re-coop:) I am working on that posting but for now....
Let's make some napkin rings for our Ocean inspired table setting.
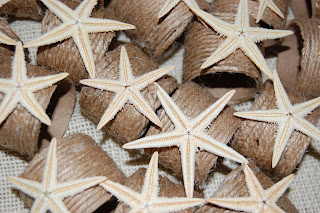
Materials you'll need - Jute Rope, toilet paper roll, Hot glue gun, Star Fish or any Shells of your choice
Cut toilet paper tube down to the size that will work for your future napkin ring. In my case, I've got 3 rings out of one toilet paper roll.

Apply a few drops of hot glue along one side and start wrapping jute rope around your cardboard ring making sure it sits tight. Secure the end with hot glue.


Choose an ocean made embellishment. In my case, I am using a dry starfish in natural color, decide which side do you like more: Top
or bottom.
My preference was a belly side for my tone on tone color scheme.

Apply your ocean inspired decoration using hot glue and you are done!

Make as many as needed
The best part for me - NO MONEY SPENT:)

Tuesday, June 22, 2010

Seashell Candles


Today I was suppose to talk about my Favor Bags items, but I was swept off my feet by this fabulous project that I came across at Martha's Web Site and since it fits my theme so perfect I couldn't wait:) and..... I had all the ingredients!
Materials you will need

Seashells
Waxed Wicks
Old Candles
Double Boiler
Note: Double Boiler - is large pot half full with boiling water and a smaller pot inside where you are doing the melting.

Let's begin! Wash seashells carefully with water and a small amount of bleach. Let them dry. Melt old candle in a double boiler. Place waxed wicks in each seashell
and pour melted wax. Let the wax cool. Trim the wicks to a reasonable length and believe it or not you are done!This is such an easy and beautiful project - thanks Martha!