Showing posts with label cute. Show all posts

Friday, June 4, 2010

Decorative pins


My daughters bedroom decorated in Shabby Chic Style. I love the charm and flexibility that comes with it. You can always add something whimsical and it will look great.
This is my cute and simple project on how to transform a simple pin(nail) into decorative picture hanger:)
You'll need a pin with clear plastic top (or just a simple nail). Hot glue and some flowers. In my case, I am using silk ribbon flowers (leftovers from my dress making projects).
Apply a drop of hot glue to the top of the pin (mail). Attach the flower of your choice.

Let it cool.
You are done!
Nice and easy, or and cute:)
Have fun!

New apron from an old favorite dress

Oh, I miss my blogging sooooo much. My dear computer had been ill and went through so many procedures but now we are celebrating its full recovery and I am celebrating my return to blogging. Despite the fact that my favorite PC didn’t feel so well, our life didn’t stop and our projects are happily piling up for new announcementsJ I guess we will be able to do 365 DIY projects without any $$$ spent.

I have never considered myself a sentimental person but I guess I am. This cute dress had been given to my daughter on her second Christmas by my best friend, and guess what, I couldn’t donate the dress, I couldn’t give to anyone, I wanted to keep it , because I still have good memories about that Christmas and the good times that we shared. OK, I am sentimental….. I couldn’t put in a garage in a pile of OTHER stuff, I wanted to use it, or should I say, re-use it? Upcycling is the wordJ

What should I do with it? Let’s think…..

Few cuts

.... and tah - dah!

New apron is ready!

I am pretty happy with my results: first of all it is a very practical thing and we can use it for few years fro sure, but I was also been able to use old pillow case as a liner for this apron, white ribbons are from recent gifts we received and I still have some fabric left for few more projects to do. The best part of it - money spent? - None.

Tuesday, May 4, 2010

Toy Organizer or Picnic Bag


I’ve had this table runner from Ikea for almost 5 years. I’ve got it when we had a little condo but we moved into the house my Interior vision had changed and this runner was hidden in the garage. If you will look through my previous posts I am into organizing lately and I have decided to make a toy organizer which also could be used as a picnic bag.

You’ll need I table runner. Mine was 18” wide and 45” long.

Red felt to trim the cuts.

1 heavy duty needle and thread.

4 large buttons

2 pieces of rope for the handles

Elastic band is optional (I’ve used it to organize my daughter’s Barbie Dolls)

Hot glue gun

I’ve planned to have a pocket on the outside of my bag and that was the only cut that I had to make. This project is very easy.

Step 1 Cut out your future pocket, considering the items you are going to be putting in plus extra ½” for bottom stitching.

Step 2 Create the bottom of your bag. Find a middle part of your runner/fabric and fold each side as you see on this picture

In my case each fold is 3", which creates 6" base. The wider your base the sturdier your bag is going to be. Trim the top of your bag with red felt.

Stitch the sides of the bottom .

Step 3

Front pocket
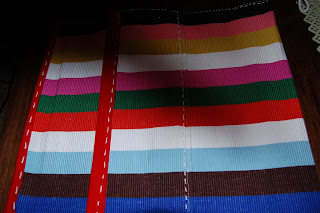
Secure the pocket in the location of your choice but leaving some room for the handles. Trim the top of the pocket with red felt. Stitch the bottom of the pocket to the bag. Don't stitch the sides yet.

Step 4 Elastic band for Barbie dolls.

We don't have a lot of Barbie dolls in the house, that's why I've created only 6 openings to hold them all, but you have more you can create extra rows:)

Step 5 Working on handles. I've used a regular rope. Create some loops on each end of the rope

In my case, I've had two pieces 30" each before the loops. My idea also called for some buttons in red, well I didn't have exactly what I've had in mind, so I had to create my red buttons.

I've used Red Spray Paint and here they are

Step 6 Attach handles to the bag and secure the back of the stitches with some red felt and hot glue

Step 7. Stitch the sides of your bag.

and you are done!

Time to organize your child's toys! I hope it helps and as usual - Have fun!