Tuesday, September 28, 2010

Suncatcher - Craft Project

On a much lighter note than my previous post, I would like to continue on Butterfly theme.
I have done research on the Internet - nobody else had it done before, I guess I am claiming the Copyright on this one:)

You will need: Lid from fresh produce or cookies or anything else that comes in a clear package. By the way, soon I will have a project on how to use a bottom from the same containers....


Nail Polish and your favorite drawings of Butterflies (if you don't have any, you can get them here), masking tape.

Start by cutting off the sides of the lid to make it flat.
Put the flat plastic piece over the butterfly drawing and secure with masking tape.


Start filling in the colors. Make sure you work in a well ventilated area because of the high fumes from the nail polish, for the same reason I would not recommend this project for kids of any age.

Let the butterflies dry over night in a well ventilated area. Voila!


My butterflies are enjoying our bathroom window - it is amazing how they are changing colors throughout the day. I've used suction cup hooks to hang them but you can create a mobile as well.

If you will decide to make these butterflies, I would like to see your pictures.

Thanks for stopping by and have a great day.

Monday, September 27, 2010

I Never Saw Another Butterfly - ATC

"I Never Saw Another Butterfly" is my new ATC Swap on Swap-Bot.com. This project was created in an effort to remember the children of the holocaust. The phrase "I never saw another butterfly" is from the poem written by Jewish boy Pavel Friedman, who was deported to the Terezin Concentration Camp on April 26, 1942 and then died in Aushchwitz on Sept. 29, 1944. The rule of the swap: we suppose to make 2 or more butterflies: one to send to our partner and one or more send to the Holocaust Museum Houston Butterfly Project Education Department 5401 Caroline St. Houston, TX 77004 USA

This is my card

In the beginning of the project- FRONT


BACK


DISTRESSING


FINAL LOOK


I've printed a map of Terezin Concentration Camp as main pattern of the card. The body of the butterfly carries a number 15000 - that is the number of children who went through this Concentration Camp in 1942-1944... Only 100 kids survived....
Distressing was done by real fire - even the smell of burned paper is part of this look. The card is very monochromatic. Under the butterfly's wings I have a simplistic drawings of numerous eyes - they represent those kids who never saw another butterfly. The thickness of the card has been achieved by layering seven layers of burned paper.
I know it is not a pretty butterfly but nothing was pretty about that time and our goal today is not to forget.......


Here is an original poem written by that Jewish boy:

The last, the very last,

So richly, brightly, dazzlingly yellow.

Perhaps if the sun's tears would sing

against a white stone....

Such, such a yellow

Is carried lightly 'way up high.

It went away I'm sure

because it wished

to kiss the world good-bye.

For seven weeks I've lived in here,

Penned up inside this ghetto.

But I have found what I love here.

The dandelions call to me

And the white chestnut branches in the court.

Only I never saw another butterfly.

That butterfly was the last one.

Butterflies don't live in here, in the ghetto.....


New week

New week. New start. This morning I have made a great discovery - pictures that made me smile. Take a look!


I have few interesting postings that I am working on right now but meanwhile, have a smile and have a great beginning of a new week.

Sincerely,


Saturday, September 25, 2010

Evolution of Spiders - Halloween Project


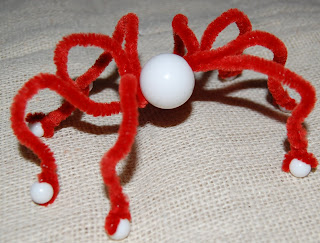
This is another project in my Halloween Series. Spiders are always part of our Halloween Decor, but this year we've decided to make them cuter:)

Materials needed: 1 large bead and few medium size and smaller size beads if you will decided to do any other versions besides version #1, and 4 chenille stems. If you don't have a bead with large enough hole, you can use pieces from ponytail holders as I did in our first spider.

Version #1


Feed 4 stems through the bead hole half way. Twist each half around to secure the legs and fold them in the shape of spider legs. The ends of chenille stems are rather sharp, that's why I prefer to do a little loop on the bottom of each leg to avoid any injuries or you can do what I did in .

Version #2


The only difference in this spider is that we added bead on the bottom of each leg.

Version #3


This spider had beads on the bottom of each leg and on top of each leg.

Version #4


Or if you have enough beads in the house, you can go all fancy and make your spider like we did.
We used three different bead sizes: the largest one - for the body, the medium size for the bottom of the feet and for all knees, and the small size to cover the space between those two sizes. Chenille stems are great for this project as well: they are small enough to go through the holes and when you twist them on the bottom of each leg it gives you a nice furry effect.

Here is our spider evolution in a brief:)


Have a great day!


Thursday, September 23, 2010

Silhouette Cutting Tool Giveaway

The Blog Community is buzzing about this fantastic giveaway. It was done before and it is here again. But what I am amazed the most is not the item of the giveaway, which is awesome - Silhouette Cutting Tool a value of $300.00, but the most genius PR that uses the power of Blogs. Each Blog that offers giveaway is a well developed Blog with huge number of followers.

I've heard about this giveaway from Crafty Crow - great Blog that I read religiously every single day. Then I've received another email from my other favorite Blog Living Locurto - great place to find ideas for party decor, get some free printable items and etc., and then I became curious who else is offering this giveaway.... Well, here is a list


You know, I've visited all these sites and they are phenomenal - I already consider myself a winner just because I found these amazing places on the Internet, and I have to thank Silhouette team for doing their great research and targeting the right places (I hope to become one of their targets in the future). So, what are you waiting for - go and enter for your chance to win and discover new interesting Blog.

Good Luck to all of us.


Wednesday, September 22, 2010

My Take on Steampunk - or my new ATC

What is Steampunk? Here is a link illustrating the meaning of it ... and here is my take on it.

I am in ATC "Steampunk" swap (that isn't even started yet) on Swap-bot.com and the reason why the Steampunk was selected because it is very new to me and I like to try out new things. I've used old wallpaper, printed images and few pieces from my husbands toolbox to embellish this card. I still need to finish the edges and put it on a cardboard.
I wouldn't say that steampunk will become my all time favorite style, but I sure had fun making this card.

Have a great day.
I am linking this project to "The Graphics Fairy" where I've got my image for this ATC


Tuesday, September 21, 2010

Easy as ..... a Button

When I was ready to do my post on Buttons and I came across this wonderful article which is much more detailed than my post was going to be but nevertheless - we are having fun with buttons and this is our picture journal


While my daughter was exploring our button collection we practiced counting, shapes, sizes, colors, sorting, threading

It is amazing how simple tools such as chenille stem and collection of buttons, can mesmerize a brain of a 3 year-old child.

Try it - it is so much fun!

Have a great day!