Tuesday, July 20, 2010

Cold waters of Monterey

Every vacation is always shorter that you think, isn’t that the truth? But our short trip to California gave me so much energy, memories and pictures that I hope will keep me fully charged for quite some time.

Our first stop was at Marina Del Rey.

We were at this place before but this time we’ve discovered a great service at Marina – it’s called Water Bus, it runs Friday PM through Sunday only, and it cost only $1.00 per person (Can you believe it!!!!!) to any one way destination within Marina. That helped us a lot to explore the territory.

Next stop was Santa Barbara (of course!)

It was a windy day but we still had a chance to enjoy the city, walk along the beach,

enjoy a supper delicious Clam Chowder Soup at Moby Dick and take a ride on my favorite Carousel.

I LOVE Santa Barbara!

On the way to Monterey!

We decided to go to Monterey along the shore line to enjoy the ocean views, but the road was so curvy with million turns and twists and road construction that it took away all the excitement and left us plain tired at the end of the road, the only good thing that we have discovered along the way was Ragged Peak .

I’ve heard about Ragged Peak on Today show and we couldn’t miss an opportunity to stop by and explore it ourselves. That was the best decision!

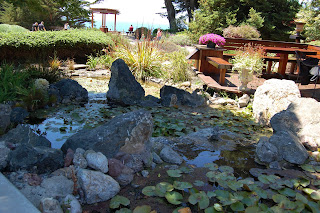
It is such a beautiful and unexpected oasis with great food, spectacular views and Zen harmony

only two hours away from Monterey.

Monterey, CA

I’ve never been to Monterey before. Santa Barbara was the farthest destination in California that I had a chance to visit and let me tell you, Monterey is so different:

sand dunes,

cold winds,

rough ocean

and unbelievable sunsets

took my breath away. The beach is not as crowded and it gives you a chance to connect with Mother Nature on a new level. I will never forget my long walks along the beach,

cold water under my feet

and coarse sand of Monterey dunes.

Even the ocean wasn’t nice and warm we still had lots to do!

Monterey Marina with Seals bathing on a sun

Monterey Aquarium

Ride on a lake

and fun on a play ground ,

these are just a few activities to name

We also went to Carmel,

and took the famous 17 Mile Drive with one Stop at Pebble Beach Golf Course.

I’ve got an amazing feeling of surreal experience – places that you’ve seen on TV are right in front of you.

You are part of it, you are here!


Ventura, CA

After 3 days we had to say “Good Bye” to Monterey. I couldn’t believe how fast time gone by! Ventura was our next and final stop…

Every hotel we stayed in was located on the beach, Venture wasn’t an exception. After a long ride from Monterey we were very tired

but still decided to pay a visit to the longest pier at Ventura and watch the fishermen and explore their culture.

Everything at that pier designed to accommodate their needs – there are places to clean and cut the fish and even to recycle fishing wires.

Next day in Ventura was more fun, may be because we rested well at nightJ We decided to go to Marina and ended up being a part of Pirates Days in Ventura.
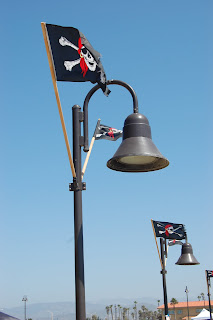
That is so much fun! “Real” Pirates are everywhere! You can see their ships in marina,

you can hear their songs. Too bad we had only few hours to spend their but we managed to get a “real” Pirate’s ice cream,

to eat at the restaurant where Pirates eat,

and have fun with Photo PropsJ

Now we were ready to go home. Thanks to beautiful places in California for this unforgettable trip, but now we couldn’t wait to see our front door and say “Home sweet home!”

Our car became our home on wheels during this vacation

and some things that I’ve made have served us really well: our trusted carry all,

Imaginarium

and my Beach Bag

are the winners!

Now, I have to work on all those projects that are on my to do list!

Sunday, July 11, 2010

Vacation

I will be back on July 19th!
Footprints Woman Beach Water 31000 Images

Saturday, July 10, 2010

Oh, so good! (Tasty snack for kids of all ages)


Tomorrow is my vacation! I can't believe it is finally here and since I'll be gone for a week, I've decided to leave you with the sweet taste in your mouth.

This is our family favorite snack.
You will need 20 oz of Mom's Best Naturals Honey Nut Toasty O's
1 cup of honey
1 cup of sugar
1/2 cup of toasted Sesame Seeds

Toast all the O's in several bunches one at a time.
Make sure they are getting nice golden color

Collect all your toasted O's in one deep big bowl
.

When all O's are toasted start working on caramel. In the same pan mix together honey and sugar and start heating it up over medium heat.

When the mixture will start getting clear and right before it will boil, add half of the sesame seeds and stir.

When it starts to boil - it is ready

Pour boiling mixture over your toasted O's. Now you need to start mixing, don't be afraid to break the little O's, make sure you'll mix them well and keep in mind your caramel will be hardening, so move fast! During this part you add the remaining sesame seeds .

Now, let put them in forms. I use cups from apple sauce - they are perfect size (in case you worry about portion control). Spray each cup with Canola oil - it will help you to get your snacks out of cup when it's ready
Here it is a nice bunch ready to go the the fridge fro overnight cold therapy

You may add some sticks and will make it even more fun!

That's how it looks on the next morning. Sesame seeds add a very interesting hint of flavor making it a bit exotic


We like it!


I hope you do too!

I will be back in a week with lots of new projects.

Friday, July 9, 2010

Rescue Mission - Ironing Board Makeover

I don't even know how I've started this project, I wasn't planning it or thinking of it but when I looked at my trusted Ironing Board from a different angle:) I've realized that I owe to my dear friend a very good face lift. I do, I really do. My ironing board have witnessed so many projects and served as my craft table so many times that all the stains and marks, even though they are dear to my heart as memories, have screamed at me - do something! and I knew, that this time my towel covering technique simply wouldn't cut it:). To the rescue!

My Ironing Board cover, despite the visible stains is in a very good shape. Why not to keep it?
I've used old bed sheet to make a new cover.
Pin the fabric down and trim allowing few inches on each side.
Tack the fabric under the edge of existing cover. Sew by perimeter, making sure it fits tight and doesn't pull an existing cover.
Guess what, that's it.
It took me 30 minutes from start to finish, but the satisfaction of this project is huge. I am sure my Ironing Board is feeling pretty and I hope it will serve me well for many years to come.

Thursday, July 8, 2010

Seashell bracelet


My upcoming trip to the ocean have occupied my mind completely. Ocean, ocean, ocean, that's all I can think of right now and projects with seashells like the one we are going to talk about today or the ones that I have done in the past make me feel that I am already there.
OK. let's begin! Materials needed: the hard cardboard core of the masking tape,
thin rope, seashells, white paint optional.

Paint the cardboard circle in white (you can easily skip this step). Let it dry.

Start wrapping the rope of your choice around, making sure it sits very tight. You can use hot glue during this process to make sure that the rope will not move in the future.

Apply seashells of your choice, using strong craft glue (in my case, I've used Costume and Mask Glue by Beacon)
let it dry for at least 12 hours and you are done. I don't know how about you, but it reminds me of my upcoming vacation (did I already said that before? ha ha ha)

Tuesday, July 6, 2010

Carry All!

Our project for today called "Carry All" and why not to carry it all when you can.

Materials needed:
Large Cereal Box, old catalogs or magazines with colorful images, ribbon in coordinating colors, glue ( I make my own, but any craft glue will work), hot glue, self adhesive shelf liner to line inside of the bag (optional), drill.

Start by drilling holes in the box for future handles.

Then cut up lots of images from your old catalogs or magazines and glue them to the box covering it completely. Line inside of the box with self adhesive shelf liner (in my case shelf liner looks like wood).
Trim the top of the box on the inside and outside with ribbons and attach the handles. You are done! Fun, fun, fun. This "bag" is so roomy it can fit so much, I think we will take it with us on upcoming trip to the ocean. 5 days till vacation!!!!